Fiat 124 Spider Fuel Injection conversion
(ie. How to convert an early Spider to Fuel Injection)
Parts needed:
Upper & lower intake manifold with fuel rail and injectors
Airflow meter (AFM) with air cleaner housing and intake hose.
Left side valve cover (has dimple in it for upper manifold clearance)
ECU, wiring and double relay
Fuel pump and filter
coolant 'T'
Aux air valve and tubing
Gas tank
Wire loom holders (firewall)
ECU holder
If your Spider is pre'73, then the battery will have to be relocated to
the trunk, or you'll have to find a different place to mount the AFM.
It is easiest to do the conversion if all the above parts are available, but some are optional.
The stock gas tank could be retained if one used
an adaptor for the different diameter hoses (FI fuel pump inlet is 13mm).
The auxiliary air valve could be replaced by an aftermarket heater valve actuated by a choke cable, thus giving manual control of idle speed (my friend Greg Gordon did this on his GTV6).
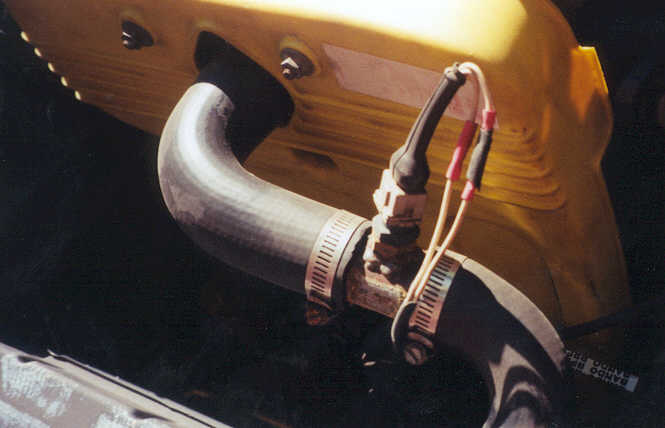
The coolant temp sensor could be located in any location where it can accurately read engine coolant temperature. Since I retained the single outlet thermostat housing on my Spider, I built a tube that goes in the upper radiator hose to hold the temp sensor.
Click here for a pic. The wires are spliced so I can insert a variable resistor at a later date.
Maintenance needed: change all rubber fuel hoses, but be sure
to use hose made for FI. Clean throttle body with carburator cleaner. Use new air and fuel filters.
I did the conversion in several days, trying to keep the car off the road for the shortest possible time.
I first installed the fuel pump and filter holding bracket under the car (drilling required) and then installed the pump and filter. When ready to finish the conversion, the metal fuel line was sawed near the filter, and connected to the outlet of the filter via FI fuel line.
Then I installed
the wiring and the ECU. A hole needs to be drilled on the passenger side of
the firewall. The wiring has a large plug that goes there, just measure its
diameter and drill a hole for it. The Ecu goes under the glove box. It is
easiest to use the stock mounting, although a holder could be easily fabricated.
Don't forget to mount the double relay nearby.
A portion of the wiring in the engine compartment snakes over to the left side
and will need to be supported at the firewall. Again, the stock holders from
an FI car work best, but something can be fabricated if needed.
The other side of the wiring goes to the AFM, and can be supported by the clips holding the lights' wiring.
Tying in the FI into the car's electrical system and the wiring for the fuel
pump has to be custom made. On the 'car' side of the double relay the stock FI connections go as follows:
86a = #50 on ignition switch (activates starter)
86c = Fuse#1
88d = Fuel pump
88y = inline fuse, then #30 (brown) on ignition switch
88z = battery (+12V)
One could copy the factory's wiring, but if Fuse#1 would blow for any reason
(some other accessory on that circuit shorts), the FI would stop functioning.
Therefore it might be better to connect 86c to the ignition switch and put an inline fuse on the wire, like for 88y.
Don't forget to connect the proper wire to the negative side of the coil, so the FI knows when to fire. There is a thick green wire for the oxygen sensor, but it is not vital that one be used.
Once the wiring and fuel systems are done, it's time to install the intake
manifold. Drain the cooling system, remove the carburated intake, and install
the lower, then the upper intake manifolds. Connect fuel supply and return lines
plus the electrical connections (injectors, cold start injector, throttle position
sensor, coolant temp sensor, auxiliary air valve, thermo time switch).
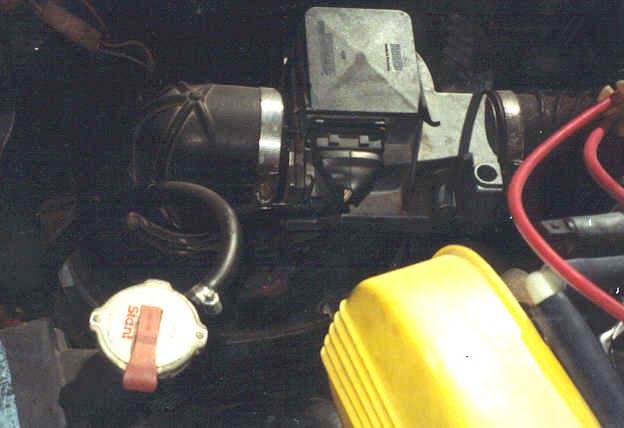
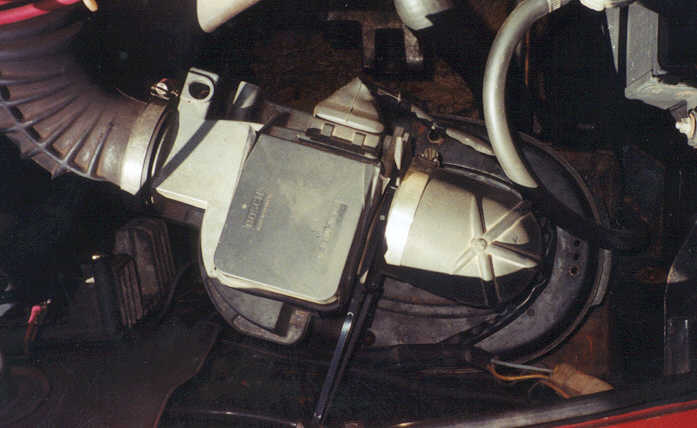
Lastly install the airfilter housing and AFM, then connect the AFM to the intake
with the L-shaped hose. One may have to fabricate a holder for air filter housing,
although I used a T-bird Turbo housing that fits right in the battery holder. Click here for a pic. And here for another.
Once everything is connected and double checked, fire her up! Hopefully it will start up after the fuel lines are filled with fuel.
If it does not start, first check for fuel (should hear hissing by the fuel pressure regulator while cranking), then check for spark. If all is OK, then make sure all the connections at the double relay are getting voltage as needed.
PS.: I plan on developing this page and add pictures as time allows.
Return to Csaba’s Fiat Page.
Return to Csaba’s Page.